

SET UP AN EMAIL ACCOUNT MAC MAIL
Welcome to Mail Configuration for CALCO UK customers.
Here you can find out how to set up your email programmes to run with your new mail account(s). Please be aware that we cannot support Apple (or Android devices) of any kind and that you use the information below at entirely at your own discretion and liability. The Apple assist programme is here http://www.apple.com/support/quickassist/
The Apple "Cheat Sheet" is here and tells you what to ask us when you are "stuck" before you contact Apple Support - All this info is actually listed below.
BEFORE setting up email on your Mac (or Android) device, ensure your email is functioning correctly by logging into WEBMAIL at http://login.livemail.co.uk - this webmail is designed for STARTER, STARTER PLUS and EXCHANGE mail accounts and can be used anywhere in the world where there is an internet connection. It also verifies that your mail is working 100% correctly and that you are using the correct username and password.
HELPFUL NOTES:
You will be locked out of your account if you get the password WRONG more than THREE times. This will re-set in a couple of hours and you can try again. Calco can also release and re-sync the account immediately (within 15 minutes) if you call us.
If your account does not appear to work and you want to try again or make a mistake etc; DO NOT simply edit the set-up boxes with new data. You should DELETE the entire errant account and start again. (dont delete any existing working accounts though by mistake)
Step 1
Open Mac Mail.
- If you have not already added an account to MacMail you will directed to the New Account Wizard.
- If you have already created an account in Mac Mail, click File, then Add account from the drop down menu.
Step 2
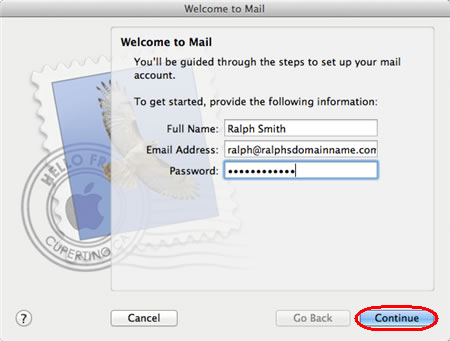
When the New Account wizard opens, enter the following in the text boxes provided:
- Full Name: Enter your full name.
- Email Address: Enter the full email address of the mailbox you want to create to.
- Password: Enter 123456 for the time being.
Once done, click Continue.
Step 3
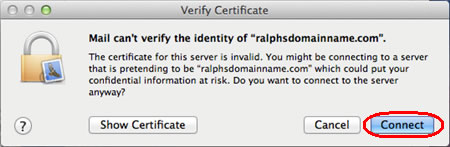
Mail will now attempt to connect to your server, it will then advise you that it cannot find an SSL certificate for your domain name. Click Connect to continue.
Step 4
A username box will now be displayed. Your username is the same as your full email address. Enter this in the text box provided and click Continue.
Step 5
Mail will now try to connect to your mailbox again and will error. Click Continue and it will prompt you to enter further details.
Step 6
On the Incoming Mail Server page, enter the following information:
- Account Type: Depending on your preferred type of connection, select either POP or IMAP from the drop down menu.
- Description: Enter a name for this account so you can identify it. This will only be seen by you.
- Incoming Mail Server: Enter mail.yourdomain.com (replacing yourdomain.com with your own domain name).
- User Name: Enter your full email address (this should already be populated with the correct details).
- Password: Now enter the correct password for your mailbox. This is the password you chose when you created your mailbox.
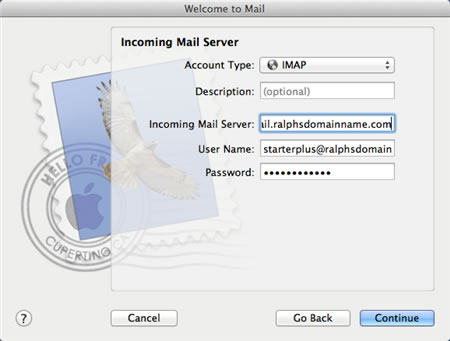
Click the Continue button when you are done.
Step 6
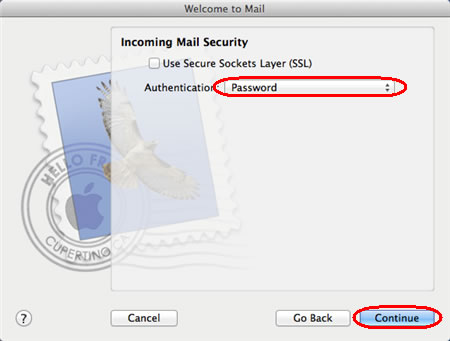
You will be prompted for an authentication method, select Password from the drop down menu and clickContinue.
Step 7
The Outgoing Mail Server page will appear. Enter the following information:
- Description: Optional - Enter a name for this server so you can identify it. This will only be seen by you.
- Outgoing mail server:
- Standard and Starter Mailboxes: Enter the SMTP server your ISP supplied you with.
- Advanced and StarterPlus mailboxes: Enter smtp.yourdomain.com (replacing yourdomain.com with your own domain name) into the text box. If you're using external nameservers you can use smtp.livemail.co.uk instead.
- Use only this server: Checked
- Use Authentication:
- Standard and Starter Mailboxes: Refer to your ISP for details.
- Advanced and StarterPlus mailboxes: Checked.
- Username:
- Standard and Starter Mailboxes: Refer to your ISP for details.
- Advanced and StarterPlus mailboxes: Enter your full email address.
- Password:
- Standard and Starter Mailboxes: Refer to your ISP for details.
- Advanced and StarterPlus mailboxes: Enter your mailbox password. This is the password you chose when you created your mailbox.
Once completed, the screen should look similar to the following:
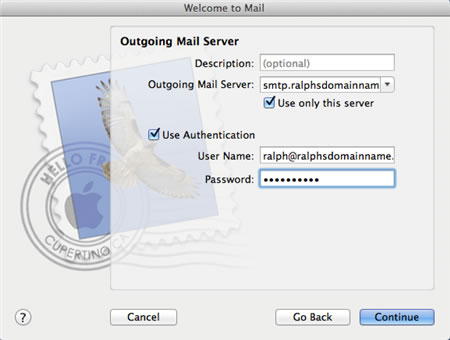
Click Continue.
Step 8
You will see a summary of your account details. ensure these are correct, then click Create.
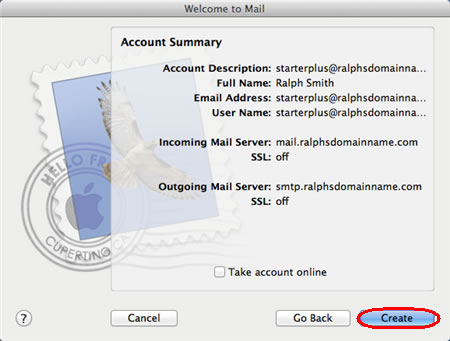
Your account will be created and you can start sending and receiving emails from your mailbox.
WHY DOES MY EMAIL FILL UP?
WHERE IS THE IMAP SETTING?
IS MOBILE PHONE MAIL DIFFERENT?
EMAIL ATTACHMENT LIMITS >>
& STORAGE LIMITS >>
Manually set Email up on iPhone & iPad
SMTP
To SEND email you need an SMTP SERVER. (Its also sometimes called a MAIL RELAY). It comes in the form of an address which you put into the SETTINGS of your mail programme. It looks like this:-
smtp.mydomain.co.uk
Where the words mydomain and co.uk are replaced with whatever YOUR domain is. SO for example if you owned a domain called abc.com your mail server addres would be smtp.abc.com
POP3
To RECEIVE email you need a POP3 or MAIL SERVER. It comes in the form of an address which you put into the SETTINGS of your mail programme.It looks like this:-
mail.mydomain.co.uk
IMAP
IMAP is a mail protocol that allows you to interact with mail on the server without having to download it.You can also create folders on the mailserver.
WEBMAIL ACCESS
For "starter" accounts ... Try http://login.livemail.co.uk - this replaces the old
http://exchange2010.livemail.co.uk