Welcome to Webmail
Choose the menu item in which you are interested:
We also post new services here as soon as they become available!
Login
The login screen is the main entry point to your webmail.
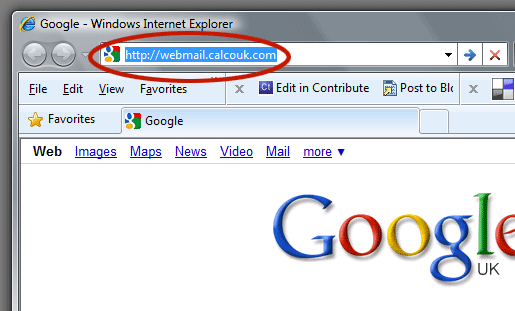
To get there type:
http://webmail.my-website.co.uk
into the address bar in a browser. (in this example we used the calco email address ... You would use your own)

You can then Log-in and retrieve, manage or send email.

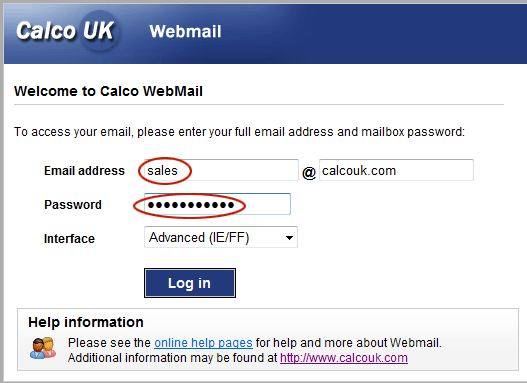
The log-in Screen
Username or Mailbox (the top box)
You need only put the prefix in the first box of the email address, the rest is already filled in.
We used SALES - you would use your own such as Michael or info or Jane etc.
Password (the lower box)
The password should be typed in EXACTLY as given to you. Pay particular attention to UPPERCASE and lowercase characters. Also if you choose a password with Zero, the letter O or a lower case o - make sure you remember which one it is... the tend to look similar on-sceen.
Interface
This can be changed to suit whatever browser you might be using. Most 'do' all the options nowadays.
Help button
Brings up an on-line version of this web page.
Login button
Click this when you have completed the username and password boxes to access your webmail.
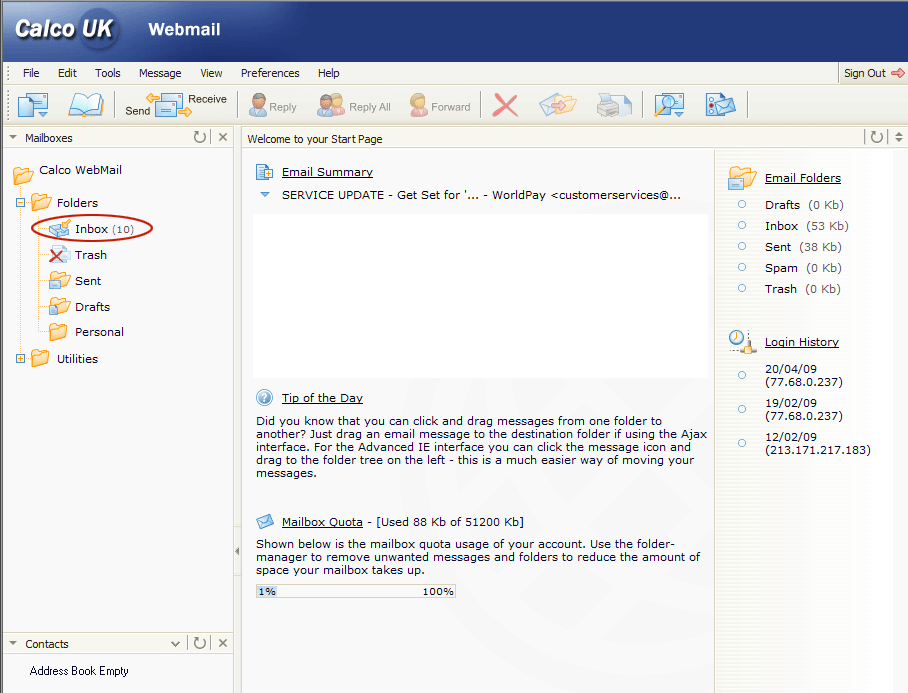
Mailbox Listing
This is the Summary Page where you select which mailbox or more correctly folder you want to go to. We have highlighted the INBOX asthis is where most people will want to go next. (NOTE: there is a switch within the OPTIONS to set the system to go DIRECTLY to the INBOX if you so prefer.)


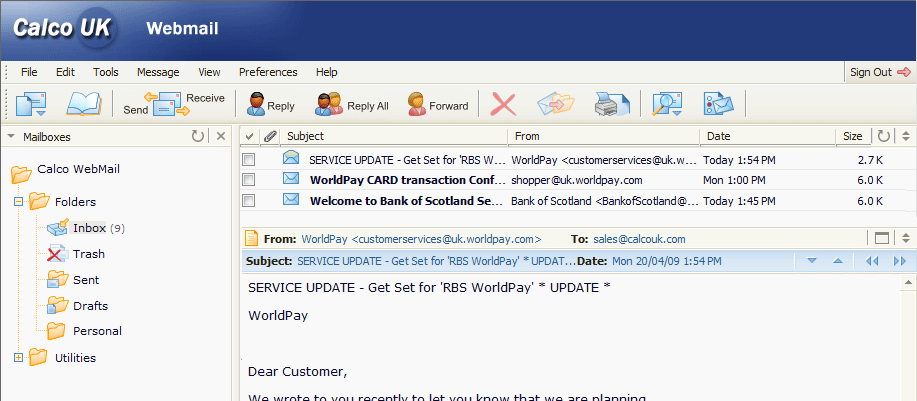
Above you can see the mail listings. At the top is a short summary of the SUBJECT and who the mail is FROM. Clicking ONCE (not double click), will allow you to see the content of this particular email in the VIEW PANE.
To delete an email simply put a TICK in the box at the left side of the mail and click the BIG RED CROSS aon the icon bar at the top of the page. Again ONE CLICK only.
To REPLY to a mail. Make sure its SELECTED so that you can see the content in the VIEW PANE and click the REPLY button on the icon bar once.
THE FOLLOWING SECTION HAS NOT BEEN UPDATED BUT APPLIES IN PRINCIPLE TO THE NEW WEBMAIL SYSTEM ... CALCO UK LTD
Navigation bars
This is common throughout webmail, and will be the primary method of getting around the application. Note that the system mau display the folders and options slightly differently depending on which format you chose when you logged in (the INTERFACE drop down menu)
The common links are:
INBOX
This takes you straight to the INBOX.
Compose
This takes you to the compose page.
Search
This takes you to the search page.
Preferences
This takes you to the preferences screen.
Addresses
This takes you to the addressbook.
Help
Brings you here.
Logout
Logs you out of webmail and returns you to the login screen.
Mail list
Here you have the main list of email and all the options to manipulate them. The links on the right underneath the order by dropdown can be used to apply any message rules you've defined, poll external mail accounts and clear the cache. This cache simple stores the summary information of the mail listing, to reduce load on the mail server and also keep things ticking along nice and fast. This link should not need to be used often at all as webmail will automatically clear the cache if the number of messages changes.
The mail list itself shows the email date, from, subject and size on the left hand side. The attachments flag may not be 100% accurate. With Internet Explorer 5.5 or higher you can right click the email to get a shortcut menu of options, the from address, and also the black "Select All" triangle. The email shortcut menu has a few quirks, in that the Delete and Mark As... options apply to all emails currently select as well as the well clicked. The Delete option will show how many emails the actions will apply to if this is the case.
Email view
This page is where you view your mail.
Headers
The default headers shown are Date, From, To and Subject. If defined, Importance and Sensitivity are also shown. You can view the all of the headers of the email in totally unparsed form by clicking the All link on the right handside. Assuming there are To or Cc headers you will be able to add the addresses in these headers to your addressbook should you wish to by clicking the contact icon or the right hand side of the address.
Attachments
Any attachments will be shown beneath the headers. Each attachment will have options to either view or download it, or both. Viewing will cause webmail to try and show it, whereas downloading will cause webmail to try and force a download. The success of both of these are somewhat browser dependent. Some attachments will also have a "View as text" option, which can be useful for viewing textual attachments which do not have the correct mime type. Attached messages will popup a new window with the message displayed simialr to a normal message. You can reply/forward etc these attached messages as you would a normal message, however when you do the popups will close automatically.
Actions
A number of actions are available to you. these are:
Reply
Enables you to reply to the sender. The sender is determined by the Reply-To, Sender, From and Return-Path headers in that order.
Reply-to-all
Enables you to reply to all people who received the message as well as the sender.
Forward
Allows you to forward the message to another recipient. If this message has Sensitivity set to something other than normal, you will be warned about performing this action.
Forward-as-attachment
Allows you to forward the message as a whole attached to a new email. If this message has Sensitivity set to something other than normal, you will be warned about performing this action.
Delete
Allows you to delete this message. Where you are redirected depends on the setting in email preferences, it being either next/previous message or back to the mailbox list.
Reply-to-list
This option is only available for messages from mailing lists which set the List-Reply header. Instead of replying to the sender, it will allow you to reply directly to the mailing list address.
Unsubscribe
This option is only available for messages from mailing lists which set the List-Unsubscribe header. It takes you to the Compose screen with the list unsubscription address set as the recipient. It will also add the word "Unsubscribe" to the subject and body in case this is necessary for this mailing list.
View email as Raw
This option will open a popup window with the email source available for viewing. This is not advisable for large messages as it will effectively download the entire message to your browser.
View email as XML
This option provides a simple XML representation of the message.
View email as Printable
This option will popup a window with the message displayed, but without the surrounding options/links, suitable for printing.
Body
The body of the email. Quoted sections (lines beginning with ">") will be highlighted in green, and signatures (everything after a sig separator "-- ").
Compose
Mail headers
This is the screen used to write new mail and send it. Some of the options here may be disabled depending on your administrators settings. The options at the top for the email headers are: From, Reply-To, To, Cc, Bcc, Subject.
cc = (carbon copy) copy the email to this address(es) also
bcc = (blind carbon copy) copy this email to these people too, but dont let them know who else is getting a copy.
If identities are enabled, the From will be a dropdown list instead of a text box. If this is the case and you have specified your name and/or email address in your personal preferences, you will need to do this before you can send mail. If identities aren't enabled, this will be a text box in which you can enter your email address. If your From is disabled, it may be that your administrator has disabled the changing of it. The headers are self explanatory, though you should note that you don't have to have a To address, only at least one of the To, Cc or Bcc
Address book
The address book on the right of the headers is a simple list, populated with all of your addresses and groups. The groups appear at the top, and the addresses are seperated by a line. You can an address or group to the mail headers by selecting it, and clicking one of the To, Cc or Bcc buttons appropriately. You can select multiple addresses/groups by hold down CTRL and selecting (Windows, other operating systems may vary). The simple Javascript search box underneath (browser permitting) the list allows you to search quickly for addresses/groups containing the phrase you type.
Attachments
Attachments can be uploaded by using the file upload option underneath the headers. A maximum size may be in effect, by default this is usually 2Mb, though it may well have been increased/decreased by your system administrator. Depending on the speed of your connection to the Internet and thus the webmail server, it may take a long time to upload large files (eg. a 2Mb file on a 56k modem will take roughly 5-10 minutes). Once uploaded attachments can be removed from the mail by clicking the "Remove" link next to its name.
Options
A few further options can be altered by clicking the Options button. This presents a new window where you can specify whether to request a Read Receipt, where to save a "Sent Items" copy, (if at all), the Sensitivity and also the Priority. You can then save or cancel these changes.
Body
The body is where you should type your message. When replying or forwarding a message there will most likely already be some text in here. If you wish you can also use the Append Signature to add your signature if you have one defined. This will always be added at the end of the text, no matter where your cursor is.
Actions
Once you've finalised your message, you can use the buttons at the bottom and top right of the body textarea to decide what to do with it. Cancel will forego sending the message, delete any attachments and return you to the message listing.Send will do just that, and barring any errors will send the message.
Sent Items
There is no folder for sent items. If you wish to keep a copy of an email you have sent, simply cc it to yourself. A copy will be delivered to your inbox as soon as you compose your email and click Send.
Email preferences
The options on this page control how email is handled and presented.
Number of emails per page
How many emails are shown per page on the mailbox listing page.
Autorefresh mail list every...
How often the mailbox listing page is automatically refreshed.
Display unread mail as...
How unread mail is displayed on the mailbox listing page. This option is IMAP specific and so may not be operational.
Display HTML version of HTML/text emails
When viewing an email that has both HTML and text parts this option controls which version is displayed. This option also depends on if you/your administrator has allowed this choice to be made. If you choose to view text parts, a link will be made available to you when viewing an HTML email to allow you to temporarily view the HTML version.
Send read receipt requests
Enabling this option will allow webmail to send responses to read receipt requests. This will be done silently and automatically, so if you're concerned about privacy, you should not enable this option.
Reply indentation character
What character to use for indenting the body text of replies.
Wrap outgoing messages at...
Outgoing messages will automatically have the lines wrapped after this many characters. Anything higher than 78 is not advisable.
Page to go to on message view delete...
When deleting a message from the message view screen, this option determines what happens next. Possible options are next or previous message in sequence, or back to the message list.
Personal Information
You can use this page to set your personal information. At the top, if enabled, are options for selecting the current identity, creating new ones and deleting them. The name, email address and reply address are all part of an identity. If identities are not enabled, you will only be able to use a singleset of values. Also, if you or you administrator has disabled the changing of your email address, you will not be able to set this, only your reply address.
The other options are your language and whether to use this choice instead of that at logon. This is useful if you don't wish to use the default choice and don't wish to always have to change it. Your signature is used when composing mail, and the checkbox underneath determines if it's used for replies and forwards.
If any of the options here are changed (except for adding/deleting identities) you will need to click the "Save Changes" button to commit them.
Addressbook
Here you can store commonly used addresses, and also organise them into groups if desired. You can add addresses in three main ways:
- By entering them into the textarea on the addressbook page and clicking "Add addresses". You can enter one address per line in the form name <user@domain> or user@domain. With the first form if the name is not purely ASCII characters you will need to surround it with double quotes ("). The email will be parsed for forename, surname and email address and if field each will be put into the appropriate field.
- By clicking the contact icon next to an address when viewing an email. This will automatically parse the email for forename, surname and email address.
- If you're using Internet Explorer 5.5 or higher you can right click the From address in the mailbox listing and choose the Add to addressbook option.
Address list
This is the list of addresses currently contained in the addressbook. You can Delete, Edit and add the addresses to a group (assuming you have one or more groups defined). The buttons will not be enabled until you selecte one or more addresses using the checkboxes on the left handside. You can select all of the addresses at once by clicking the black triangle at the top right corner. The address list can be ordered by clicking the column headings (and also right clicking these headings if you have Internet Explorer 5.5 or higher).
Group list
This lists the currently defined groups, as well as the special group "All addresses". You can add a new group by entering the name in the text box underneath the group list and clicking "New group" (you cannot submit this form by pressing enter). You can then add addresses to this group using the address list above or the Edit option. The Edit option takes you to a separate page where you can edit the name and add/remove members.