How to add a picture to your website using SUSSed CMS
This guide is for use with the new Sussed Content Management System from Calco UK Ltd:
- Save As - Lets make a new page using an existing one
- My Documents - Save it somehere you can find it again
- Uploading to a webserver- Uploading the newly created image to your website
- Insert the image - Adding the re-sized and optimised picture to your webpage
SAVE AS - A way to make a new page with little or no effort
Pick a page that contains all or most of the elements that you need e.g. the header, a content area and the menu.
Press ESC three times and Log In
The Save As double disk icon
Once the page loads immediately save it using the DOUBLE DISK icon giving it a FILE NAME and a PAGE TITLE in the boxes provided. You should make a note of the filename including the dot and the extension eg mynewpage.html where in this case the extension is the four letters html
If all has gone well you will see the new file name on the right of the lower button bar. In other words you are now editing the file you have just created

The file you are currently editing is shown here
Adding a Graphic is a simple matter so long as you understand file managemnt and how the internet works. Most people DONT know this information so lets begin with your PC and an image you want to place on your new web page.
We now perform FOUR Steps
1) Create the graphic
2) Save it locally on your PC (somewhere easy to get at)
3) Upload it to the website
4) Insert the image into the document
NOTE: Once you understand the process you can use SUSSed advanced Dialog Boxes to shorten this process as there are several ways to achieve the same end result!
STEP ONE: CREATE THE GRAPHIC
Lets suppose you have taken a picture with your digital camera or bought one on-line for your website. Its likely that its the wrong size ... generally it will be too big. We need to make the image as small as possible but still contain the message we want eveyone to see. We do this by using an IMAGE programme like Photoshop, Photoshop Elements or Paint Shop Pro. You could even use an online service like http://pixenate.com
We are often asked what size should a web image be. There are no fixed rules however we use the following measurements. Note that we DONT use inches or centimeters - we use pixels.
Large image 800 pixels across the way (as opposed to down the way)
Medium image 350-400 pixels on the longest side.
Small image 175-250 pixels on the longest side.
Thumbnail image 100 pixels.
See below :-
![]()
First make a copy of your image and we will work with this - just in case we loose it and cant get it back! Professional Web Designers ALWAYS work with copies and make regular back-ups.
Open the image in your image editor software and:
Make it brighter or darker
SCALE the image to one of the Large Medium or Small sizes (or the exact size you require)
Sharpen the image and adjust the contrast as by re-sizing an image down the way you are loosing a lot of the information within the image.
SAVING YOUR WORK IN COMPRESSED FORM
SAVE the image to a simple location on your PC. We recommend going to MY DOCUMENTS and creating a new folder called webpix or whatever. (see section : Save it somewhere simple)
Images of real world subjects like people, cars and landscapes should be saved as JPG files - pronounced J-pegs.
Images of Text, straight line subjects, diagrams and pie charts with only a few colours can be saved as GIF files - pronounced gifs.
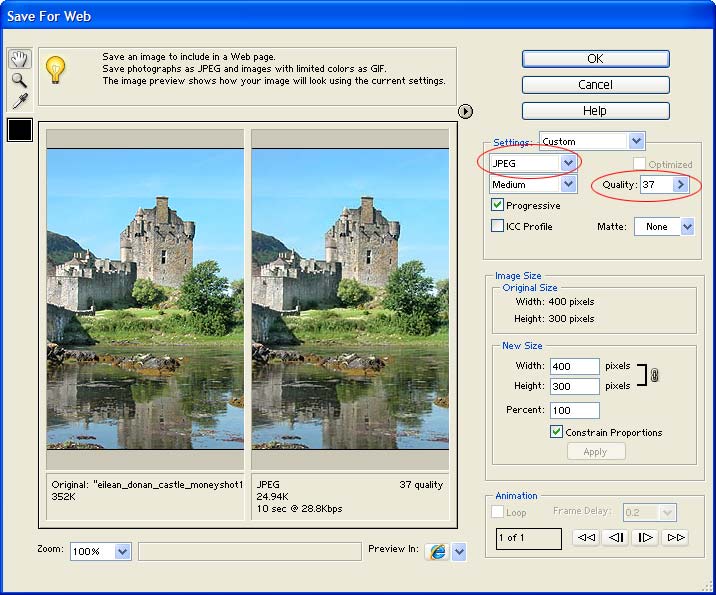
Photoshop Elements Image Editing software - JPEG is selected at Compression Quality 37 (out of 100 quality levels)
You could also change the SIZE of the image here too using the NEW SIZE feature. Its currently set to 400 x 300 pixels
To make the files transmit quickly from your finished website to the visitor's PC, you should compress the image when saving it as a jpeg. The facility to do this comes with most image editing programmes and we normally use the following QUALITY ratings:
Best quality work is saved at 60 (out of a hundred)
Good quality work is saved at 50
General quality work is saved at 40
NOTE: The above numbers are qualatative and not absolute as differing software houses use different ways of describing the jpeg compression. IN general though:
An 800 wide pixel image should compress to not more than 170k (usually less)
An 400 pixel image should compress to not more than 45k (usually less)
An 250 pixel image should compress to not more than 25k (maybe less)
That said ... the whole purpose of re-sizing your image is to make it the EXACT SIZE you wish it to be in your web page. So if your picture has to fit into a space 175 by 200 pixels ... make it that size in your Graphics Editing Software. Dont try to do it later on in SUSSED - if you do the results will not be as effective and a probably a bit fuzzy.
![]()
The above image was saved at 60% quality is 778 pixels wide and its file size is 147kb
The inset images are to show relative pixel sizes on a typical website.
STEP TWO SAVE IT SOMEWHERE SIMPLE ON YOUR PC
It sounds obvious but you have to be able to find the image again once you have saved it. We suggest saving it in a folder within MY DOCUMENTS. On most PCs My Documents is easy to find, so any folder within this should be obvious to spot, even on a crowded machine.
In essence then ... save your picture from within the graphics programme as a jpg file (or gif) to a folder (that you must create - lets call it webpix) within My documents.
![]()
The New Folder Icon
NOTE: You can easily create a new folder when you are in My Documents by clicking the NEW FOLDER icon. Once the folder is created move into it and save your work.
STEP THREE UPLOAD THE GRAPHIC TO YOUR WEBSITE
The picture for you website is now on your PC in somewhere sensible called maybe webpix which is in the My Documents folder.
For the world to see this image you must UPLOAD it to a public place such as a webserver. This is just a fancy name for the PC in a big telehouse that HOSTS your website.
To upload the picture simply click the button in SUSSED called UPLOAD FILE.
Upload File Icon
A DIALOGUE BOX opens and asdks you for some information.
The Upload File Dialogue Box
Click the BROWSE button which will allow you to Browse your computer for your picture. Navigate to My Documents and the folder you created (in this case webpix) and locate the picture you made in your graphics package. (The folder you made in My Documents) Select it by clicking it once and press the OPEN button.
Choose File Dialogue - Note you can use the circled icon to display your choices as icons (as above)
if your system currently displays the choices as file names.
Next make sure that the BINARY radio selector has a dot in it (if not click it to put one in) and press the UPLOAD FILE BUTTON.
The Upload File Dialogue Box - make sure there is a dot in the Binary radio selector (as shown)
After a short wait you will be asked if you want to upload any more images. We dont want to so click CANCEL and then because we are done click CANCEL again.
You have uploaded your file and its ready to insert into your web page.
STEP FOUR : ADDING THE GRAPHIC TO YOUR WEB PAGE
Click into the position within your web page where you want the graphic to appear. Make sure you are in the right place; the insert location usually represented by a flashing vertical line.
Click the INSERT IMAGE button. A whole variety of options are offered which you can explore at leisure. We want to simply INSERT THE IMAGE to go ahead and press the INSERT IMAGE button. The image will now appear on the web page. If you want to add a border (i.e. further edit the image appearance) simply DOUBLE CLICK it.
3 of the 8 Image Grab Handles are circled in red (left) The Border setting is circled in red (right)
Lets select a border width of 1 pixel and click the APPLY button. Your image now has a border. If you are happy with the border press the CLOSE button. To CENTRE the image SELECT it so the little HANDLES appear and then click the CENTRE BUTTON. The image is now centred.