Welcome!
Build a Ryzen 7 PC
Buying list, links & pricing for easy construction of a RYZEN 7 CPU based PC
Complete list for self-build & reasons for choices
Building a Ryzen PC is easy so long as you know what components work with the Ryzen 7 Chip.
Its also important not to waste your money on cutting edge technology that will only give a marginal performance boost. This is the main reason we are now using Ryzen 7, because the equivalent Intel chip would be more expensive for workstation purposes at the time of writing this article. However to be fair to Intel the i7 7700K even with lower cores represents excellent GAMER value.
We also looked at Ryzen 7 1700 vs the slightly faster 1700X model. However the 1700 comes with a fan and heatsink, whereas the 1700X does not.
So if want the best value for your money and a machine that will happily render 4K and most games.
All stock is from Amazon, because their prices are competitive, delivery is great and if you have Amazon Prime, delivery is FREE and FAST!
Here is the magic recipe which definitely works, because we built it! (All links open in a new window)
Ryzen 1700 with 8 cores and Fan with Heatsink in the box! 274GBP
This cpu offers a "free" heatsink and fan (with LED). The speed is only slightly slower than its 1700X and 1800 counterparts and DOES have 8 cores. Best value for money in the range.
Corsair ATX Case with transparent panel and fan 47.60GBP
Great cable management, easy placement for all components, deep enough for a long Graphics Card and has 2 USB3 sockets on the front. It looks good.
RAM: Corsair Vengeance 16 GB Kit (2 x 8 GB) DDR4 3200 MHz CL16 XMP 2.0 High 144.95GBP
Fast RAM matched to the Motherboard and CPU. Listed as compatible with the motherboard and leaves 2 extra slots for expansion later.
Hard Drive 512GB : Samsung 960 PRO M.2-2280 PCI Express 3.0 x4 NVMe Solid State Drive 277.44GBP
A luxury, but a speed boost like no other. Windows Professional installed in just over 5 minutes. Programmes just snap on the screen and any application using Hard Disk as a "scratch disk" benefits greatly as regards speed.
Motherboard: TOMAHAWK Socket AM4 AMD Ryzen 7th Gen Athlon DDR4 USB 3.1 ATX 98.22GBP
A nice mix of features for Ryzen at under 100 pounds.
Power Supply Unit, Corsair 650W 55.46GBP
Overkill, buy you need reliability and 24 hour operation for long video rendering or uploads etc. So there is an overhead of 150W and its from a reputable brand.
ASUS GeForce GTX 1070 8GB Turbo Edition 4K & VR Ready 439.99GBP
Handles 4K and all major games at max. What more can I say except at this price its expensive. Wait a month and the price may go down.
NOTES: There are currently major supply issues with 1070 and 1080 graphics cards. This is due to BITCOIN MINING as they are buying cards by the hundred. Now there are month long waiting times as supplies trickle back in to the retail market. The prices are roughly 100 pounds over those at release.
The graphics card will be the most expensive part of the build because the machine is designed to process 4K Video (and of course will handle mot games superbly well). However if your needs are not that great, definite bargains can be had by buying a cheaper card. Note that older cards and cheaper cards have less RAM :-
Graphics card (budget) 239GBP : Zotac NVIDIA GeForce GTX 1060 6 GB Mini GDDR5
We will post new items here if they are better performing or more cost effective!
NOTES: At the time of building our projects the GTX 1070 8GB (single fan) WAS 345 pounds, however the price has risen to around 419 pounds because of the excessive demand on this technology by Bitcoin Miners. It does however demonstrate what a great card it is.
HOW WE BUILD THE PC THE EASY WAY!
Now... a week or so after we built our PC we were comforted to discover that a top internet show had come to the same conclusions as we had. Watch the guys build their PC here https://www.youtube.com/watch?v=WcS7RsPTiUY and see how easy it is to put together a PC.
We dont agree on their method of construction, preferring to mount the RAM, CPU and Fan/Heatsink on to the mothernoard, and then, gently ease the mobo ito the case. However the video shows all the componenets and how they fit on the the Motherboard and into the case.
LEGAL : Every reasonable care has been taken in the drawing up of this narrative on how WE went about constructing a PC form the parts above. We will not and cannot accept responsibility for any harm or damage caused by the narrative or commissions on this page. Neither do we accept ANY liability in any form if you copy what we did.
Hints: I use a tin lid for screws - you should use something too. Tricky locations can be reached by a magnetic screwdriver OR a blob of blu tack on a screwdriver to "glue" to the screw to the driver while you get it into location.
There are Videos for EVERY step below on the web, made by a hundred different builders just like you and me. If you get stuck, just watch the one you need help with. It is easy - you just need to see it done once! The parts are all expensive, so don break them by pushing hard. Simply watch a video first.
Remove all the packing that comes with the parts. This is covered in their respective manuals.
Lastly, parts will be shipped in new versions as the months go by. So installation may vary.
1) Unpack the case and remove both side panels. Locate all wires and remove and packing.
2) Install the Power Supply (PSU). Familiarise yourself with the leads, especially the 8 pin one for the Graphics Card. There is a spare dangly bit. It simply slots in beside the adjacent 6 pin plug. (see later on - installing the Graphics Card). Keep the Mains lead and plug safely aside.
3) Unpack the Motherboard (Mobo).
3) Unpack the Ryzen Processor or CPU. !!!DO NOT HANDLE ANY OF THE 1,331 PINS!!! and install this on the Motherboard, observing the TRIANGLE TO TRIANGLE RULE. I usually hold the CPU by the sides and VERY gradually bring it into alignment with the socket (holes). You then jiggle it with a feather's touch until you feel it locate (drops in). Remember you have all the time in the world!
4) Next we need to remove the extra Heatsink Supports on the mobo which wont be required. Its in the manual and CPU Sheet. Note doing this releases the back plate so do it close to your worktop or table. All this info is in the manual that comes with the HEATSINK AND FAN.
5) This is the hardest part so take your time. Line up the backing plate which by now will be unsecured from the back of the Mobo. Correctly line up the Heatsink and fan. (They can come apart so don worry if this happens). Then try to located the screws in the appropriate Mobo holes. You can give this screw a LITTLE pressure to get it to locate. Tighten the screws one turn at a time, diagonally, until the Heatsink is firmly attached. Attach the Fan power leads to the mobo.
6) Unpack the hard drive or M.2 Drive (pronounced M dot Two Drive and has the fun name of an "Envy Me" or NVMe Module) Locate it in the manner described in the Mobo Manual. Its easy. One side, with the gold pins slips into the slot on the Mobo. The other end is tightened with a screw to the Mobo. The screw on the mobo may be in the wrong place, just remove it and re-locate in the correct hole. The M.2 drive will make your build fly!
7) Fit the RAM Modules. Push apart (out and down) the plastic tabs at each end of the RAM slots or "banks". Observing which banks need to be filled first (see manual) Press each RAM Module firmly but gently till they "click in". The plastic tabs you previously pushed out/down, should have located into the Ram Module.
8) Fit the Mobo "Backing Plate" or "Pass-through Plate" to the case. This allows the Motherboard's USB, SOUND and other ports to pass through the case.
Fit the Mobo to the case, starting with the sockets that go through the backing plate. Take your time!
9) Fit the 2 power leads to the Mobo from the CPU. They are clearly marked. Note one power lead will have to cross the PCIe slot for the time being.
10) In a clockwise manner, fit all the case wires to the mobo. Refer to the manual constantly. If the wire has a stripe - its likely to be +ve. Dont quote me though!
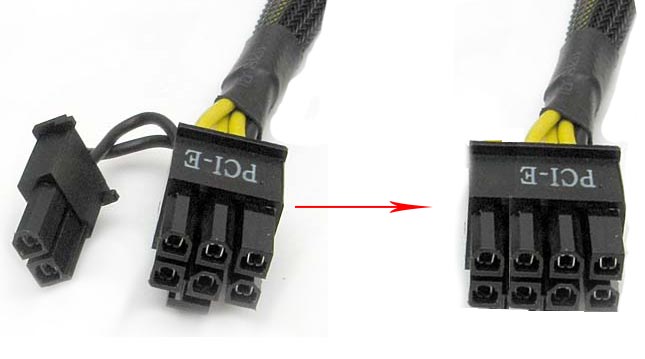
11) Fit the Graphics card. First remove the back panel "blanking plates" AND the retaining bracket above them. Lift the Mobo Power lead out of the way (so that its over the card as its too hort to run behind the case). Slowly manoeuvre the back of the card into position and drop it into the PCIe3 slot (the big shiny one?) make sure its seated and screw the card into position where it comes out the back of the case. Refit the retaining bracket. Now connect the power lead from the PSU. These come in two parts a six piece and a two piece. The Two piece fits on to the six piece so that "curvy bits" on the plug all face the same way.
DONE>
Then get a USB Stick - load it with Windows from the Microsoft download website. Buy or obtain a legal licence number or OEM license for your downloaded Windows. Put these to one side. (not into the machine) Fire up your new machine and go get a cup of tea / coffee. After a minute or two the BIOS will have sorted out all the bits in your machine and there may be a message to EXIT BIOS. If not do so and another message will come on the screen. Pop in your USB stick with the windows install files and push go*. Windows will install in around 5 or so minutes. Amazing!
* If the machine repeats itself and wont "see" the usb drive, shut it down. Wait 10 seconds and start it up with the USB Drive in the USB slot. This should get things going. If not consult a HOW TO video on youtube
If your Windows license fails to REGISTER, use the windows Registration Helpline. https://support.microsoft.com/en-ie/help/10738/windows-10-get-help-with-activation-errors